Wednesday, January 28, 2015

DIY Baby Gate

After the little guy took a couple tumbles down the stairs we decided to get a legitimate gate but when looking at what was on the market nothing was catching our eyes. Our other concern was getting a gate that would actually fit our unusual stair railing shape. So I did what I always do and visit Pinterest and Etsy for some inspiration to create my own custom gate.

I had a bunch of 3/4 MDF, 2x4 and Bead Board from leftover projects so it made this project pretty cheap. I did have to buy the hardware which was just over $10 and a small sample bottle of paint from Lowe's. 

One of my biggest concerns on this project was wear and tear and overall stability of the gate. On the side where the hinges are attached I used a 2x4 for extra strength.

This is also my first Kreg Jig project. I was really impressed with how smooth and easy this tool made joining the frame of the gate. To hide all of the pocket holes I drilled everything on the back side and then hid them with the bead board as I tacked it right to the back of the frame.


Materials Used:
3/4 MDF
2x4
Bead Board
1 1/4 Kreg Screws


Monday, January 26, 2015

Split Entry Design!

I have one goal in mind with my entry way and that is to have people think twice about split entry homes. I never thought I would settle on buying a split entry a few years back because like many I had this stigma against them thinking they were totally out dated and not something that could look good or function properly. I hope that this post and future posts will show that you can make anything look appealing even if others cant see the vision.

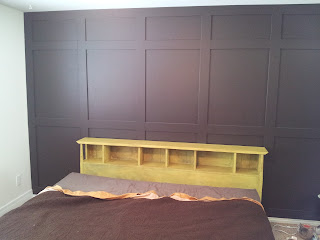
This is not my first board and batten attempt in my split entry home. I have done a half wall in my sons room and a full wall in our master bedroom. Both of which turned out great and I have certainly learned things along the way. Please take a look at my other posts. Half Wall Board and Batten - Full Wall Board and Batten


In our split entry we have nice vaulted ceilings and I really wanted to make the living room and entry way feel as big as I could. So adding this awesome design to the top portion of the wall really helped accomplish this.

I decided to use 3/4 MDF as my material of choice. If you have ever used MDF you know there are some pro's and con's. Low cost and smooth finish is at the top of the list of Pro's the bad part about MDF is it takes a lot of prep to make sure it looks good as a finished product. Priming, sanding, painting, sanding, painting and maybe even another sanding with touch up paint but once its done it looks great.

As far as the dimensions of the squares they are about 16" by 16". I ripped the 3/4 MDF into 3 inch strips. I decided to go with 3/4" MDF rather than 1/2" MDF because I wanted a more drastic look, giving it more depth on the blank boring wall.


When working with MDF I would really recommend using a random orbital sander to make sure all the joints are level and smooth. My goal was to make it look like one solid piece of wood in the end. In certain lights you can definitely see the joints but for the most part it looks pretty dang good.


Also another tip is make sure you use some liquid nails to adhere to the wall and make sure it sticks. I found out the hard way by missing a few of the boards as the nail gun didn't keep them nice and tight when I started sanding. Luckily I only missed 2 of the small pieces so it wasn't a huge deal.


Caulk and wall putty are your best friend when trying to make something look professional.


 Let me know if you have any questions or comments!

Sunday, January 25, 2015

DIY Fireplace Makeover!

One of my favorite projects in casa de Harward has been my fireplace mantel. Please take a few seconds and see the drastic change. I still have some things I want to do to make it "Mine" but this is how it will stay for a few weeks I'm sure. This fireplace was really tricky because of the stone, I was unsure how to accomplish the task of making it look built in and fit the space. 


Here are some before pics as you can see this is the original fireplace with the brown stone. For some reason I didn't take a picture right before I started building the mantel so these will have to do. This pic was taken right before we bought the home 3 years ago.


I'm in love with the craftsmen look and the mantel had to be that style. I knew I wanted it nice and big to fit the spot and also somewhere that I could put a TV over top of it. The fireplace was the focal point of the room so why not make it a star. To start out of coarse I went to my favorite places Pinterest and YouTube to get some inspiration on how to accomplish building my mantel. I didn't stick to just one site or blog but I pulled a lot of inspiration and knowledge from all sorts of places.

So I started with a nice sturdy frame of 2x4's. I also took the opportunity to run electrical so I could place an outlet on the outside of the mantel for running lights for holidays and another box inside the mantel for powering the TV. 


Once the frame was built and anchored to the wall I started wrapping it 1/2 MDF


 I used 3/4 MDF for the top shelf.


I scribe'd the top of the mantel with a jig saw to fit nice and tight to the stone.

Adding the Trim design was next I used 3" strips of 3/4 MDF


I installed our "Gigantic" 32 inch TV to the fireplace thinking I was done but it just didn't seem to fit correctly. So I convinced my wife to let me prime and paint the stone. I used "Glidden Gripper" and then some Semi Gloss white paint from Lowe's called "Snowy Mount" to really make the piece look good. 


 Oh and to top it all off I won a 50" TV from my company Christmas party, I think it fits the spot a little bit better.


What I would like to do next is add some crown molding under the top shelf and possibly build some column legs under neath to finish it all off.

Tools I used:
Table Saw
Miter Saw
Jig Saw
Nail Gun
Drill
Sanders
Caulk Gun

Materials I used:
1 - 4x8 sheet of 3/4 MDF
1 - 4x8 sheet of 1/2 MDF
5 - 2x4" x 8'
1 - Box of 3" Screws


DIY Projects!

We have been hard at work at the Harward household. Here are the projects I have worked on over the past few months. I will be posting about each one individually with before and afters but I just wanted to give a quick sneak peak as to what I have been up too!


DIY Fireplace Make Over!
My 5 year anniversary gift to Anna!

Added a bunch of casing in the house.
Repainted our room.


Built this for a co-worker.
Added board and batten design to entry way.


Built console table out of my child hood desk!

Helped Anna redo her makeup table.
DIY Custom Baby Gate

Saturday, December 28, 2013

Chalk Paint!

Here is my latest project, Chalk Paint! This is an amazing product made my Annie Sloan, what is so great about this product is that you have zero prep work and you can paint anything! Yes no prep work that means no sanding, no stripping just find what you want to paint and go to town. What I have found is that there is no one perfect way to use chalk paint you just "throw" it on. 


We have wanted to paint our headboard for years and we just could never find the motivation to do it. Once we found this product from Annie Sloan we knew we had to do it. We went with the "English Yellow" color; I used clear wax and dark wax to give it a great antiqued look. It took me a good 2 hours total to go from something we just had to something that we now love. 


Before


After